User guide
Controlling The Device
- Info Screen - hold any button for 2 s
- Settings Menu - hold any two buttons together for 5 s
Firmware v2.2.1 and below:
- Info Screen - hold any button for 2 s
- Settings Menu - hold any button for 5 s
Home Assistant
You can configure most of the settings directly in Home Assistant.
To get to the device's page in Home Assistant, click settings in the left side bar, then open Devices & Services, move to the Devices tab and click on the name you gave your Home Buttons during setup.
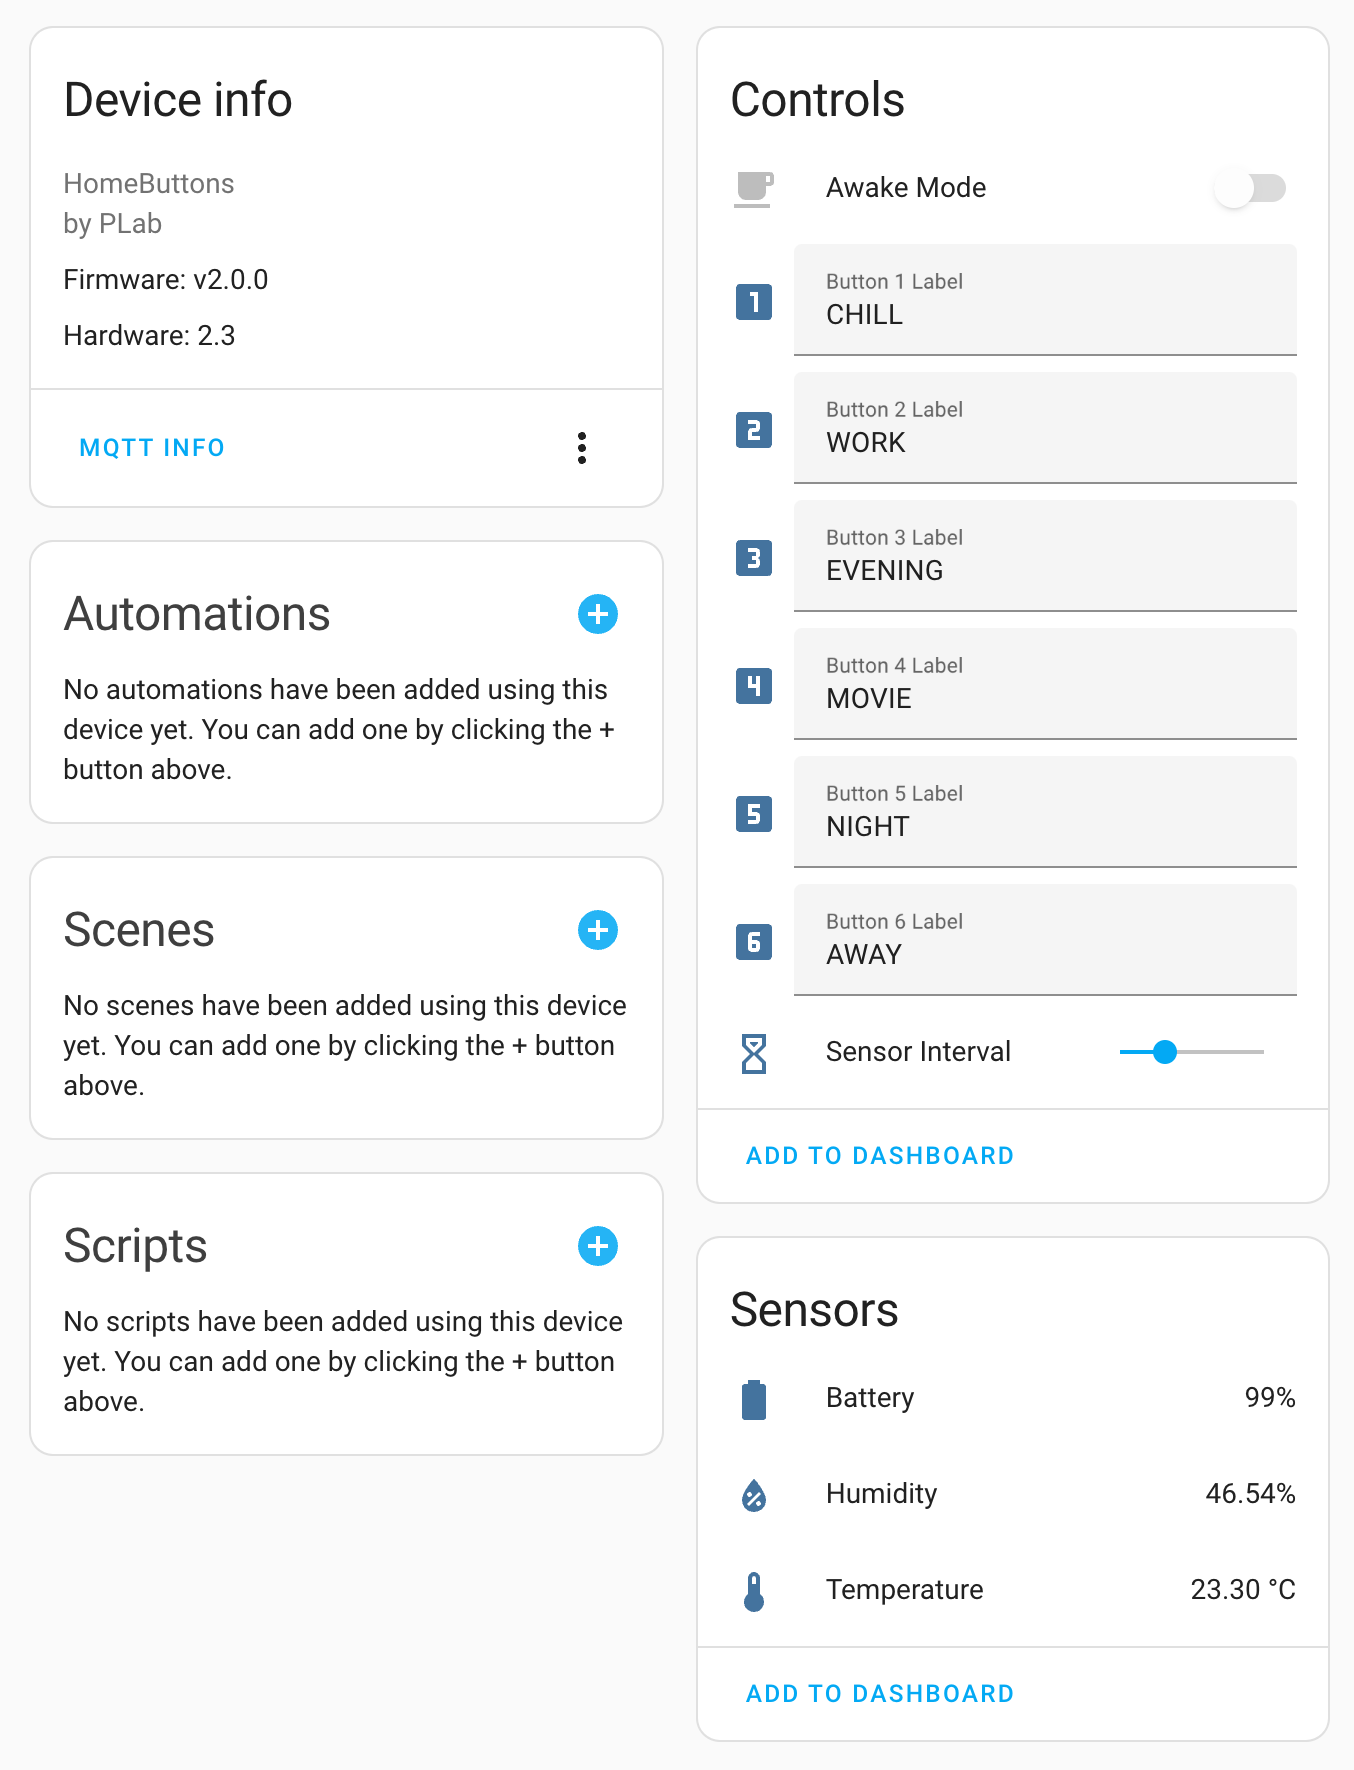
Configure Button Labels
In the Controls card, enter the button labels that you want to be shown on the e-paper display. The buttons are ordered from top to bottom. Labels will be updated next time you press a button or on the next sensor update interval. Labels can be:
Text- Icon
- Mixed -
Textand Icon
Text
Enter any text you want. Labels support UTF-8 with special characters. Home Buttons will choose between two font sizes automatically. It can display around 5 letters in large font and around 7 letters in smaller font.
To force small font, prepend text with an underscore:
_. Example:_Bedroom.
Icons
You can choose any of the Material Design Icons. Enter the icon name in the label field in the format mdi:{icon name}. For example, mdi:lightbulb-auto-outline.
Icons are downloaded from the Icon Server. For that purpose an internet connection is required. Once downloaded, the icons are stored permanently on the device. If you do not wish to have Home Buttons connected to the internet, you can set up the icons once and then disable internet access. Alternatively, you can host your own icon server. See Self Hosted Icon Server for more information.
Mixed
In label field, enter: mdi:{icon name} {text}. For example, mdi:lightbulb Bedroom. There must be a single space separating the icon name and the text. Label name must always be first. The actual position of the icon will be before or after the text, based on the location of the button.
Icons are slightly smaller in this mode.
To force small font, prepend text with an underscore:
_. Example:mdi:lightbulb _Bedroom.
Configure Button Actions
To configure button actions, click "+" on the Automations card, select one of the buttons and set up an automation with Home Assistant's editor.

The expected delay from a button being pressed to the automation being triggered is around 1 second (depending on your network).
Configure Sensor Publish Interval
The device uses deep sleep to preserve battery. It wakes up every few minutes to measure temperature and humidity and publish the data to MQTT topics. You can set the publishing interval with a slider on the Controls card. The range is from 1 to 30 minutes. The default is 10 minutes.
Be aware, that this setting greatly impacts the battery life. The advertised battery life of > 1.5 year is achievable with the interval set to 10 minutes (the default) or greater.
Sensor Intervalparameter will only be used in Sleep Mode. In Awake Mode the sensor publish interval is 60 seconds.
Awake Mode
Home Buttons supports two modes of operation:
-
Sleep Mode
The default. Home Buttons will spend most of the time in deep sleep. It will wake up and connect to network only when a button is pressed or every few minutes as specified by the
Sensor Intervaloption. When changing button labels, the display will only be updated at the next wake up. -
Awake Mode
Available only when USB-C is connected or if device is powered by the 5 V DC input. In this mode the device is always on and connected to network. Changing button labels will update the display instantly. The sensor publish interval is fixed at 60 seconds. The disadvantage of this mode is that the temperature sensor reading will be a few degrees too high, since the Wi-Fi modem is generating heat.
Awake Mode is only available on Home Buttons hardware revision >= 2.2 by default. If you wish to enable it on earlier revisions, you must perform a hardware hack.
Settings Menu
Open the Settings Menu by holding any two buttons together for 5 seconds. The menu will show the following options:
- - Setup
- - Wi-Fi Setup
- - Restart
- - Close settings menu
Restart triggers publishing MQTT discovery message and icon download. The first time after a restart, Wi-Fi connection will take a few seconds longer.
Device Info
You can see details of you device like software version, hardware revision and IP address in the Device Info menu. To access it, hold for 2 seconds.
Factory Reset
To perform a factory reset, hold for 10 seconds. Home Buttons will restart and all user settings will be reset to default. You will have to set up the device again.
Info Screen
Info screen displays current temperature, humidity and battery percentage.
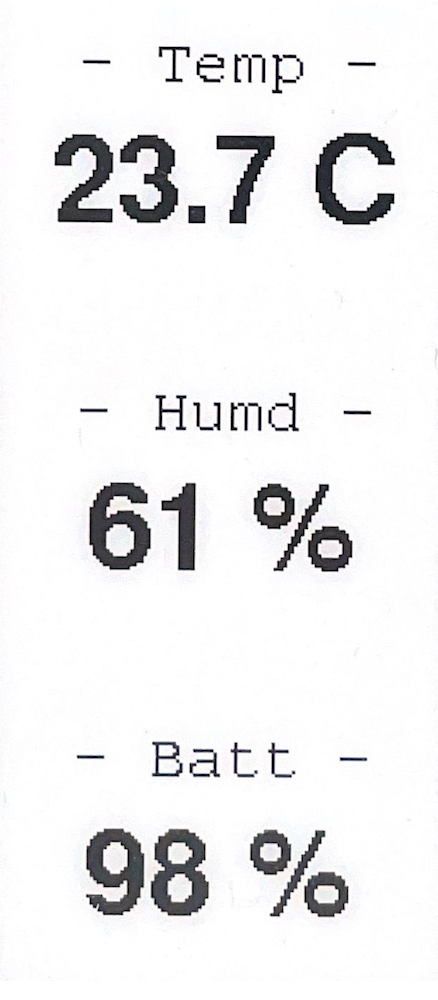
Bring it up by pressing any button for 2 seconds. Home Buttons will automatically revert to showing button labels after 30 seconds. Or do that manually by pressing any button again.
Setup
Setup allows you to change connection settings and button labels. Home Buttons establishes a web interface accessible within the network it is already connected to.
Begin setup by going to Settings Menu and pressing . Home Buttons will display instructions for connecting to a web interface. Scan the QR code or enter the local IP into a web browser.
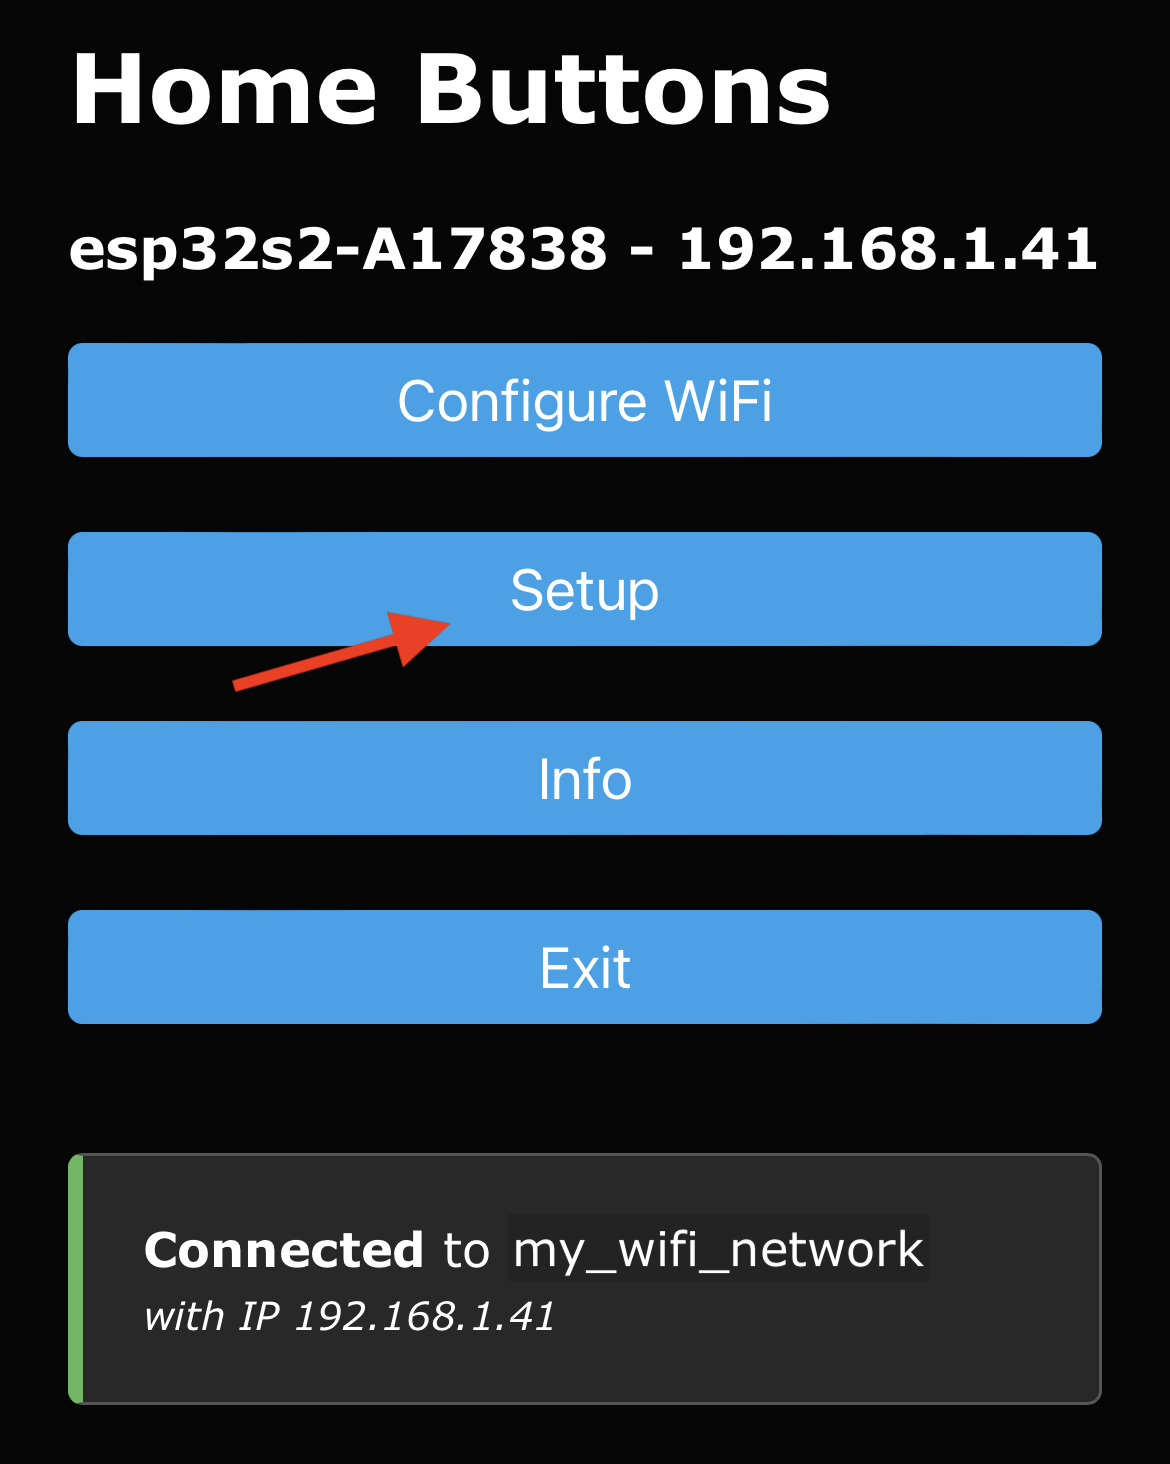
Change Wi-Fi settings
Click Configure WiFi to change Wi-Fi connection settings. Select a network, enter the password and click save. Wait a few seconds and then press any button to exit setup. Home Buttons will connect to the newly selected Wi-Fi network.
Change device settings
Click Setup. A page with the following parameters will open:
-
Device Name- Name of your device as it will appear in Home Assistant. -
MQTT Server- IP address of your MQTT broker. Usually the same as IP of your Home Assistant server. -
MQTT Port- Port used by MQTT broker. The default is usually 1883. -
MQTT User- MQTT user name (can be empty if not required by broker). -
MQTT Password- MQTT password (can be empty if not required by broker). -
Base Topic- MQTT topic that will be prepended to all topics used by Home Buttons. The default ishomebuttons. -
Discovery Prefix- Home Assistant parameter for MQTT discovery. The default ishomeassistant. Leave that unchanged if you haven't modified Home Assistant's configuration. -
Static IP- Optional. IP of Home Buttons. Must be outside the DHCP address range of your router. -
Gateway- Optional. The IP address of your router. -
Subnet MaskOptional. Usually255.255.255.0. -
Primary DNS Server- If left empty,GatewayIP will be used. -
Secondary DNS Server- If left empty,1.1.1.1will be used. -
Button {1-6} Label- Label that will be displayed next to each button. The order is from top to bottom. -
Icon Server- Default ishttps://icons.home-buttons.com/mdi/. See Icon Server for more information. -
Temperature Unit- EitherC- Celsius orF- Fahrenheit.
When done, click Save. Device will exit the setup and display button labels.
If MQTT connection is not successful,
MQTT errorwill be displayed and Home Buttons will return to welcome screen. You can start the setup again by pressing any button. Please make sure to enter correct MQTT parameters.
Wi-Fi Setup
If Home Buttons becomes inaccessible on the local network due to changed Wi-Fi settings, you can restart the Wi-Fi setup at any time.
Open Settings Menu by holding any two buttons together for 5 s and press . Wi-Fi hotspot will be established and connection instructions will be displayed.
-
Home Buttons will establish a Wi-Fi hotspot. Connect to it by scanning the QR code on the display or manually connecting to Wi-Fi network and entering the password.
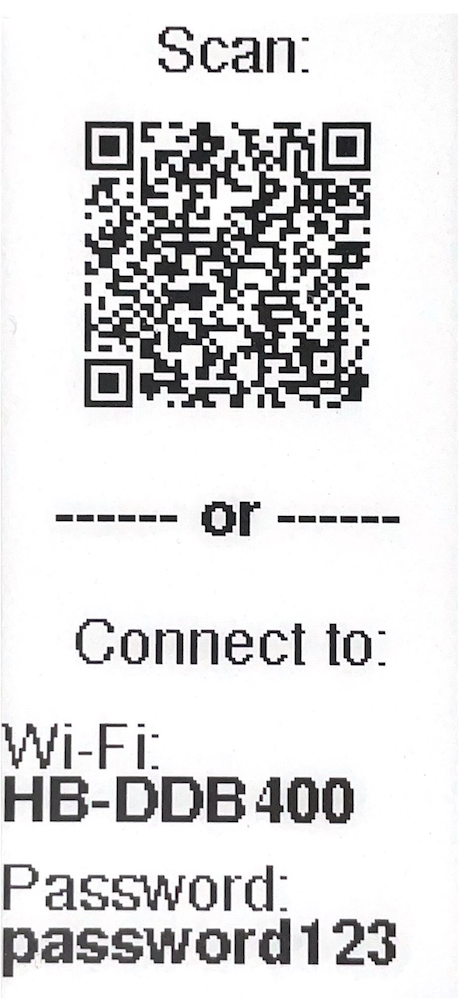
The Wi-Fi password is
password123. -
After connecting to Home Buttons Wi-Fi with your device, a captive portal will pop up automatically. If it doesn't, open the web browser and navigate to any web page. You will be redirected to the captive portal.
-
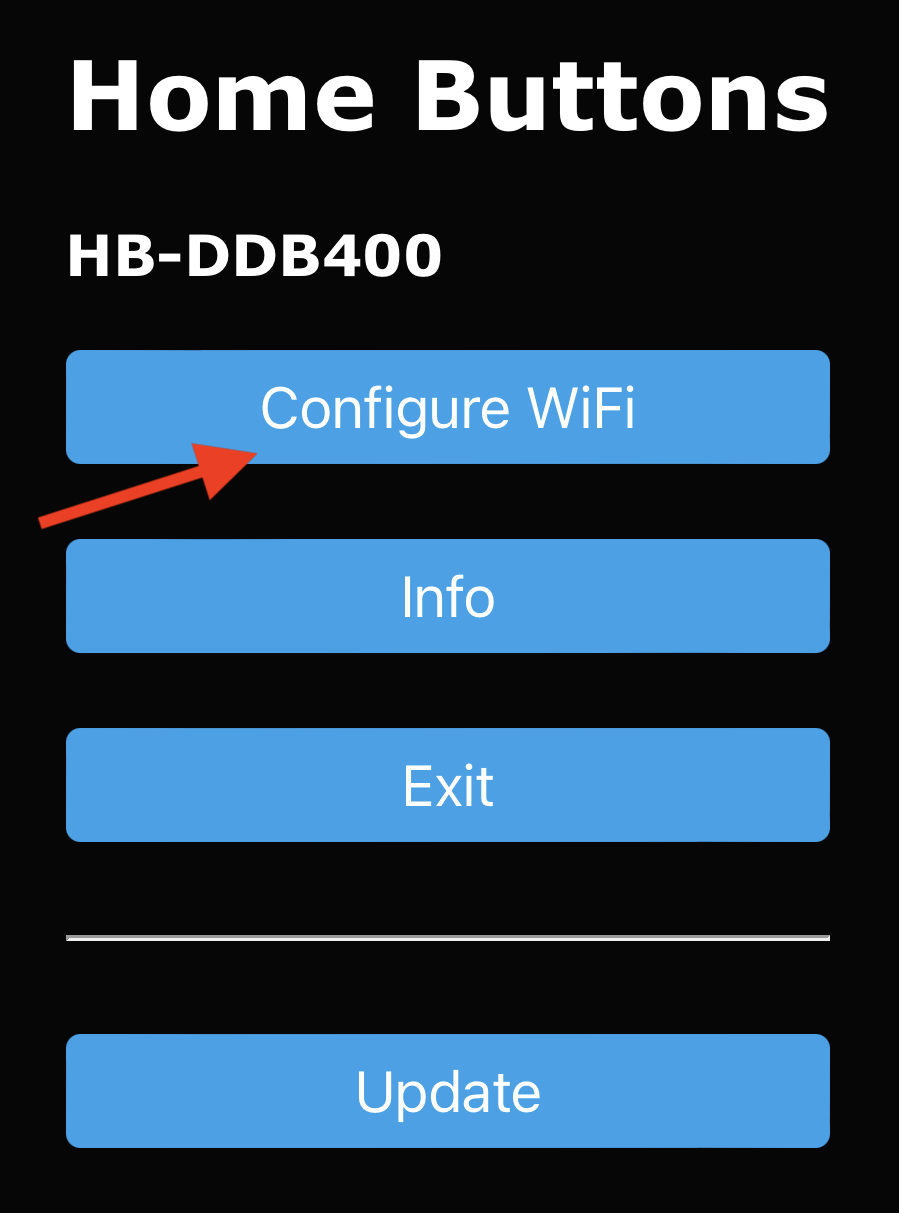
Click
Configure WiFiand wait a few seconds for a list of networks to appear. -
Select your network, enter the password and click
Save.
Home Buttons will disable the hotspot and connect to your Wi-Fi network in a few seconds. Wi-Fi CONNECTED will appear on display.
If connection is not successful,
Wi-Fi errorwill be displayed and Home Buttons will return to welcome screen. You can start Wi-Fi setup again by pressing any button. Please make sure to enter the password correctly.
Display a Custom Message
A custom message can be shown on the e-paper display by inputting it in the Show Message field on the device page in Home Assistant.
You can also use the Show Message entity in automations:
action:
  - device_id: 966128a1b5d43dd1b22424cd0a77d44c
    domain: text
    entity_id: text.home_buttons_265cbf_show_message
    type: set_value
    value: "Test \n Message"
Message will not be wrapped automatically. You must include line breaks \n manually.
Alternatively, you can display a message by publishing a retained payload to the {base_topic}/{device_name}/cmd/disp_msg topic. The message will be displayed when the device wakes up on button press or sensor publish. You can clear the message by pressing any button.
Example Home Assistant publish service call YAML:
service: mqtt.publish
data:
  topic: homebuttons/HB Mini 123/cmd/disp_msg
  payload: "Line 1\nLine 2"
  retain: true
mosquitto_pub example:
Schedule Wakeup
You can schedule the next wakeup using the Schedule Wakeup entity. This is useful if you are changing labels dynamically based on state of other devices.
For example: If some action you trigger with a button press is not instant, but takes some time to complete, you can schedule the next wakeup after the action is completed. This way the label will be updated sooner, instead of having to wait for the next sensor publish wakeup.
Example Home Assistant automation YAML:
alias: schedule test
description: ""
mode: single

# Change button label immediately on press
trigger:
  - platform: device
    domain: mqtt
    device_id: 966128a1b5d43dd1b22424cd0a77d44c
    type: button_short_press
    subtype: button_3
    discovery_id: HBTNS-2301-001-265CBF button_3
condition: []
action:
  - device_id: 966128a1b5d43dd1b22424cd0a77d44c
    domain: text
    entity_id: text.home_buttons_265cbf_button_3_label
    type: set_value
    value: _OPENING...

# Schedule next wakeup after 15 seconds
  - device_id: 966128a1b5d43dd1b22424cd0a77d44c
    domain: number
    entity_id: number.home_buttons_265cbf_schedule_wakeup
    type: set_value
    value: 15

# Simulate some action that takes 10 seconds
  - delay:
      hours: 0
      minutes: 0
      seconds: 10
      milliseconds: 0

# Change button label after action is completed
  - device_id: 966128a1b5d43dd1b22424cd0a77d44c
    domain: text
    entity_id: text.home_buttons_265cbf_button_3_label
    type: set_value
    value: _OPENED
You can also schedule wakeup by publishing a message to the {base_topic}/{device_name}/cmd/schedule_wakeup topic. The message payload should be the number of seconds to wait before the next wakeup. The minimum value is 5 seconds.
Set labels dynamically
You can set button labels dynamically from Home Assistant automations or by publishing a MQTT message.
Home Assistant
Use a text.set_value service call to set the label of a button. The entity ID is text.{device_name}_button_{button_number}_label.
You can use templates to set the label based on the state of other entities:
service: text.set_value
data:
  value: "{{ states("sensor.time") }}"
target:
  entity_id: text.my_buttons_button_1_label
You must use this service call. Device actions do not support templates.
MQTT
Publish a message to the {base_topic}/{device_name}/cmd/button_{button_number}_label topic. The message payload should be the label you want to set. The label will be updated on the next wakeup.
Icon Server
Home Buttons downloads icons from an Icon Server. The default is https://icons.home-buttons.com/mdi/, hosted by us.
The icons are in the BMP format, converted from the official Material Design Icons SVG files. The server is used only when the icon is first downloaded. After that, the icon is stored in the device's flash memory and can be used offline.
Repository with converted BMP files and converstion script is here.
Self Hosted Icon Server
You can aslo host your own icon server. Home Buttons expects the following URL structure:
{ICON_SERVER}- IP address or domain name of your icon server{icon_name}- Name of the icon, as in the Material Design Icons repository.{icon_size}- Size of the icon. One of the following:100x100,64x64and48x48.
All three sizes must be available.
Example URL: http://192.168.1.123/100x100/home.bmp
When using a self hosted icon server, the device is not using HTTPS. It's recommended to only use it on a local network.
Hosting with Home Assistant
For a simple fully local setup, Home Assistant may be used as an icon server. Create a new folder mdi in the www directory and copy the BMP files there. Then set the Icon Serverto http://{home_assistant_ip}:8123/local/mdi/. The icons must be in the following structure: /mdi/{icon_size}/{icon_name}.bmp. For example: /mdi/100x100/home.bmp.
Opening The Case
Latest Case Revision
If you need to remove or replace the battery, or perform a manual firmware upgrade, you have to open the case. The back cover can stay mounted to the wall during the procedure.
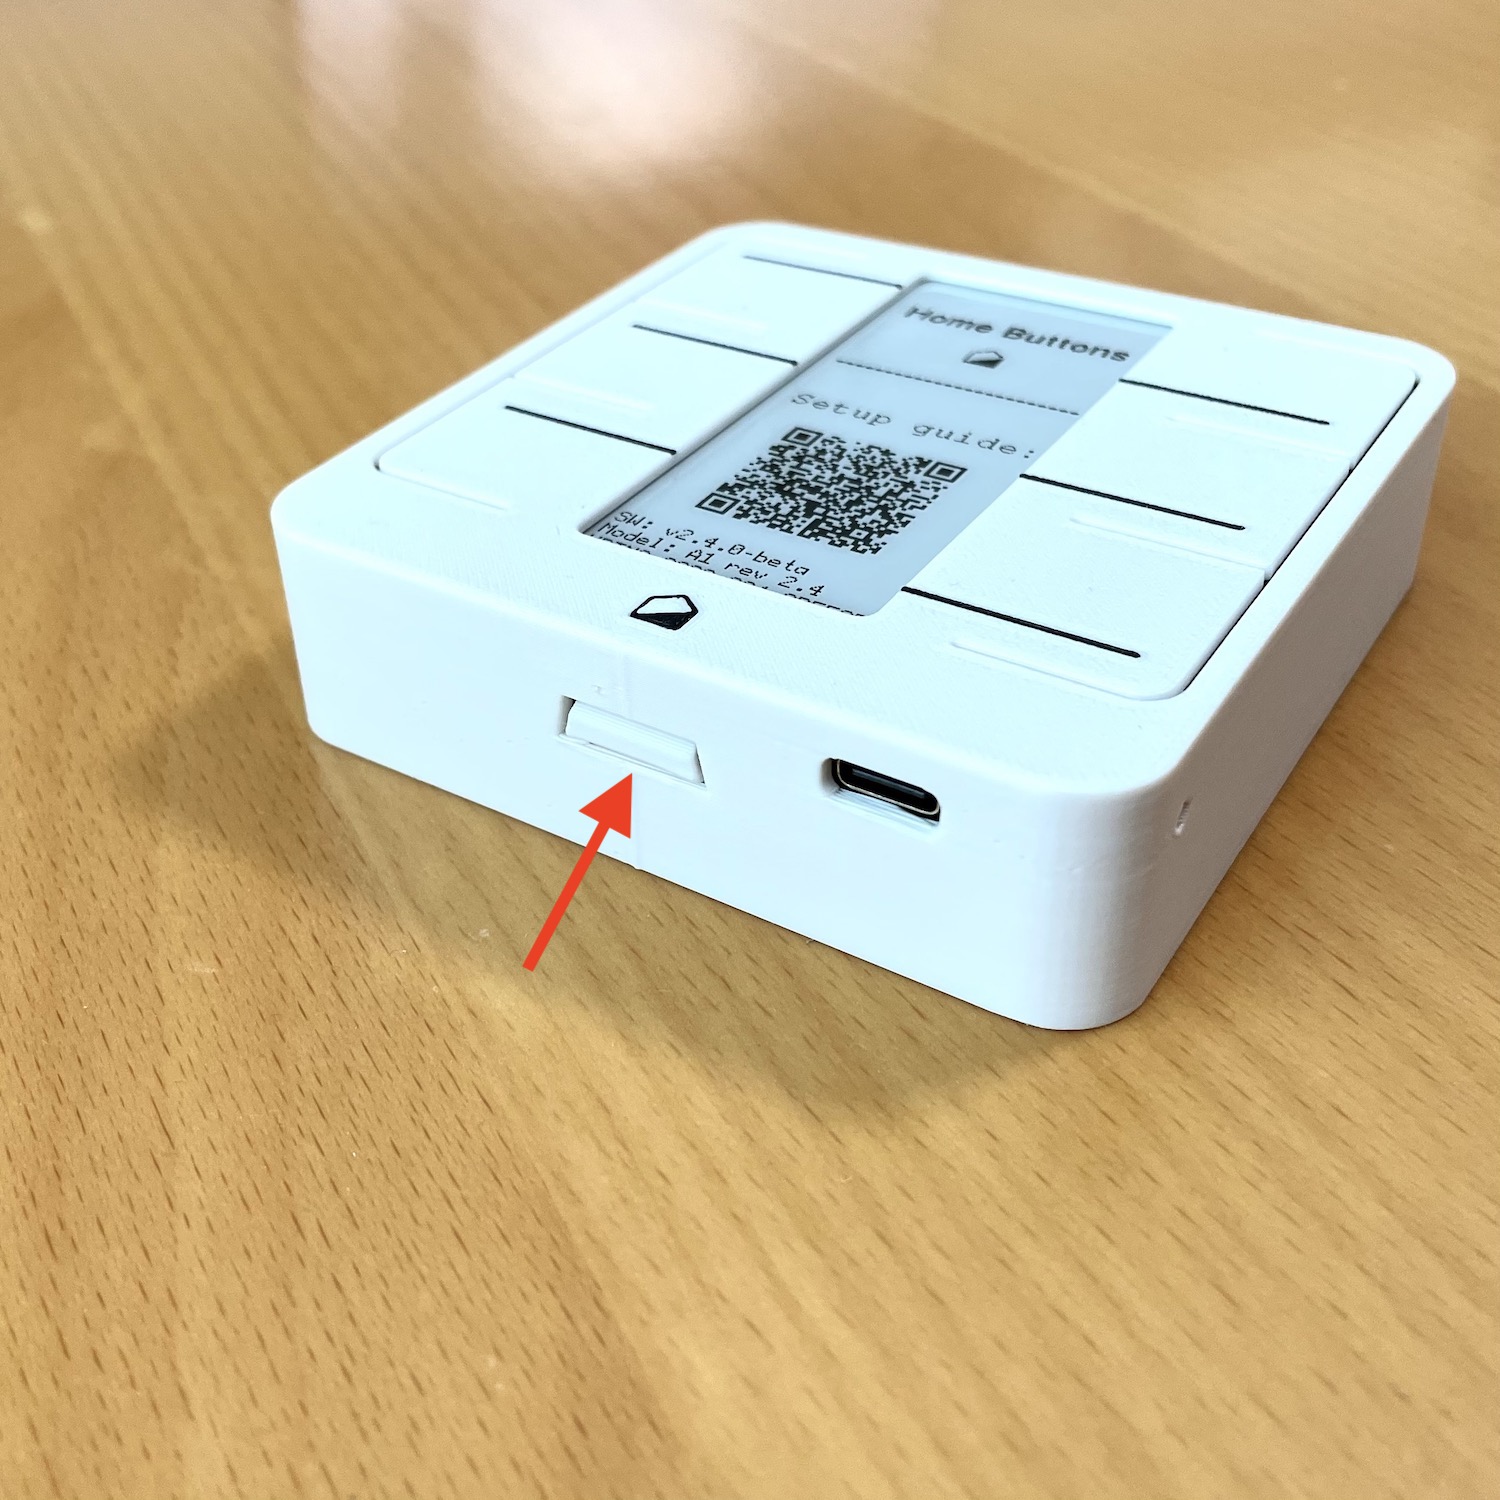
-
Open the back cover by pressing the tab on the bottom of the device.
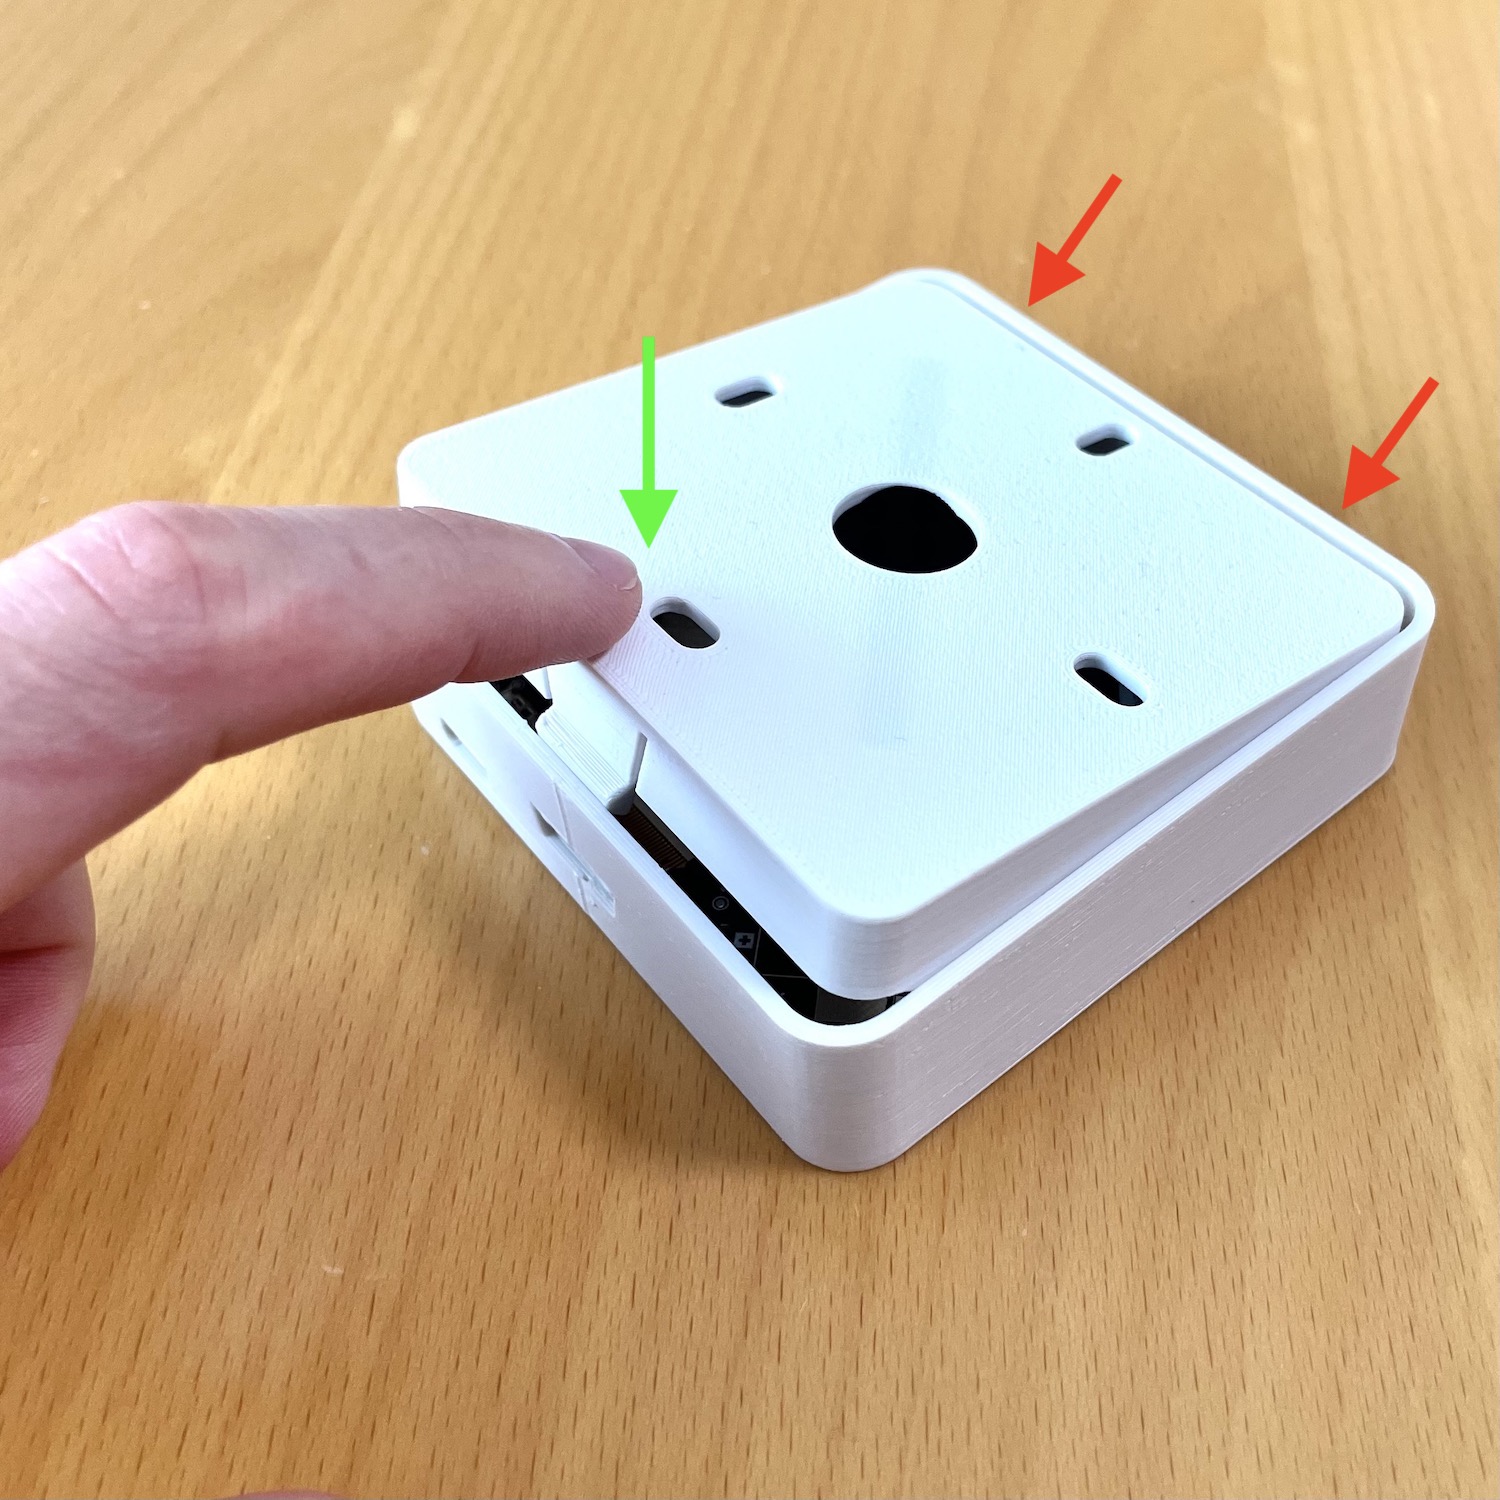
-
Replace the back cover by aligning it first at the top and then pressing it down until it clicks.
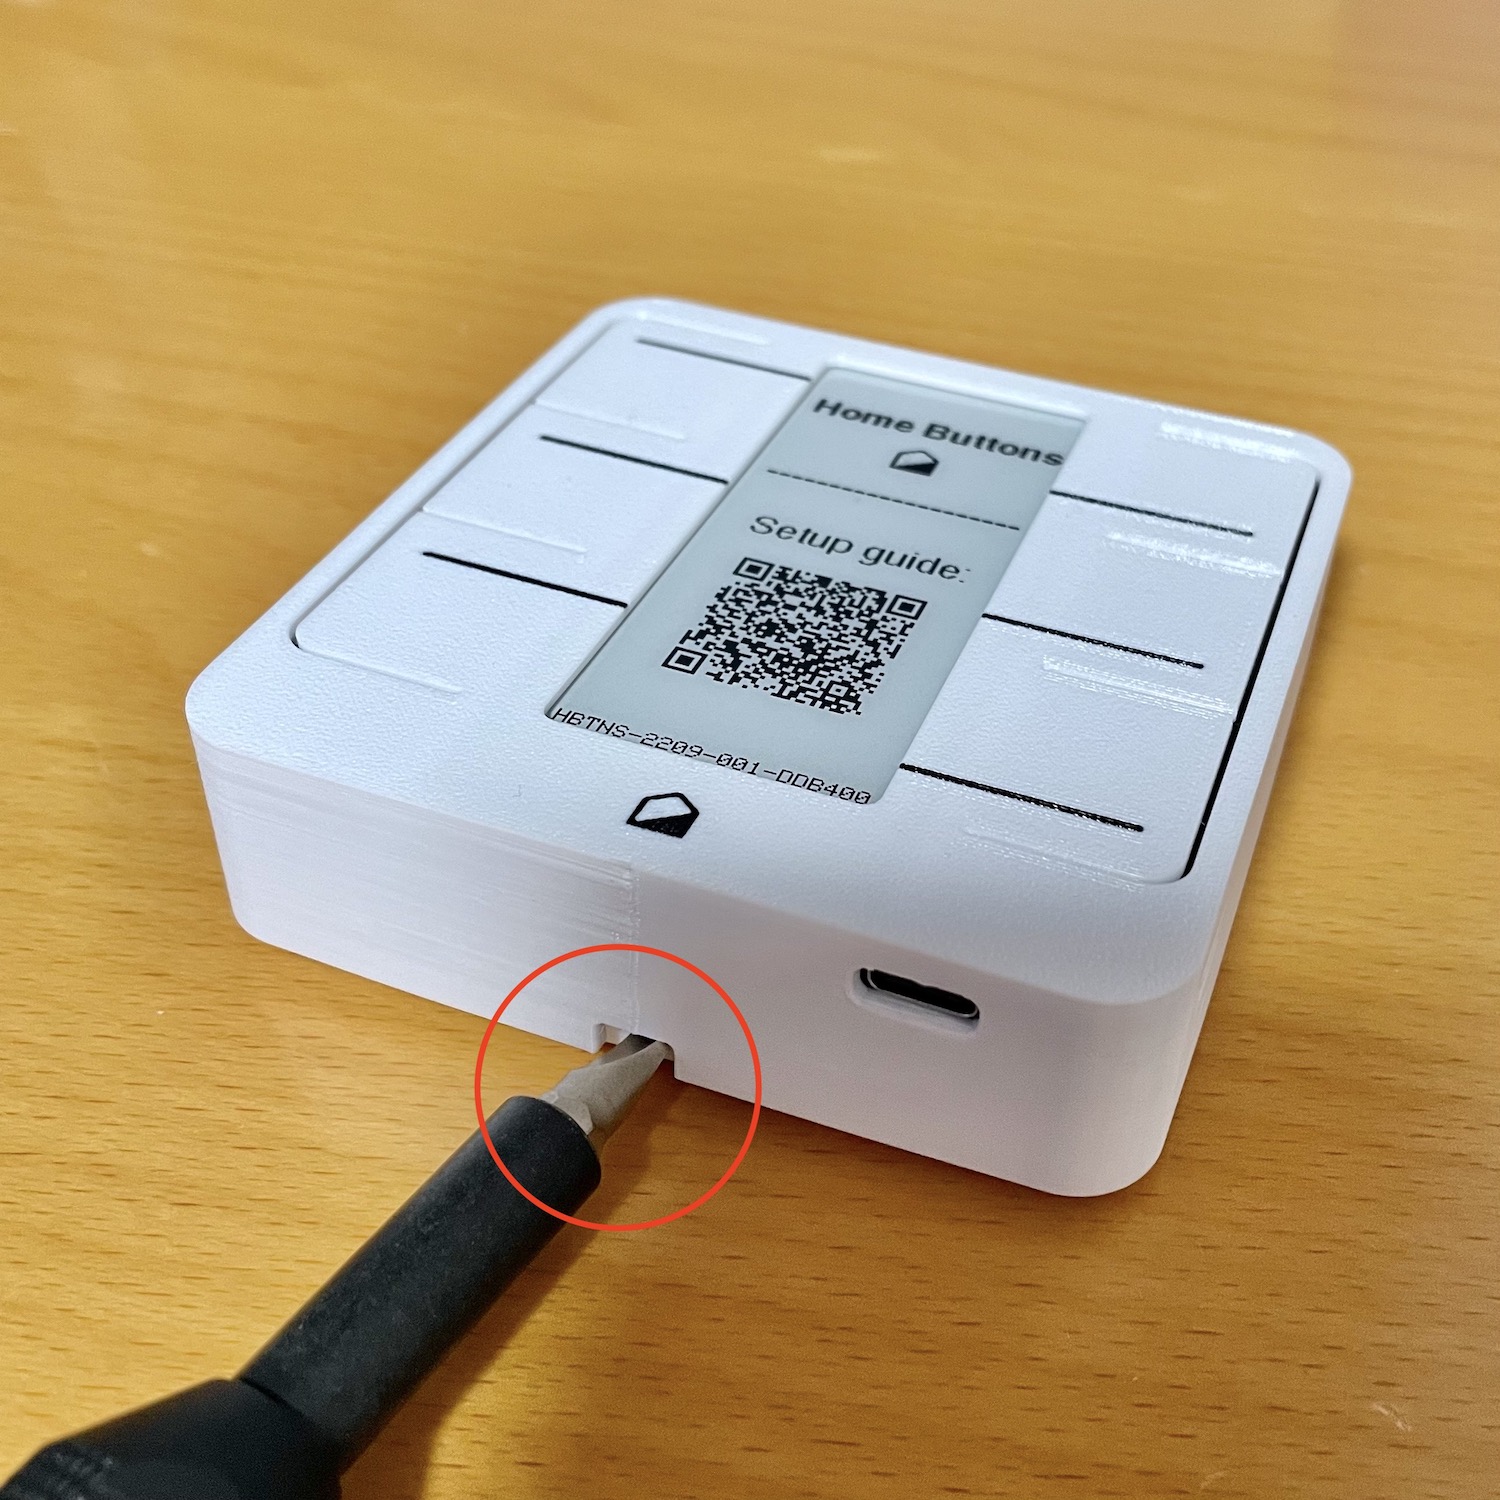
Older Case Revision
-
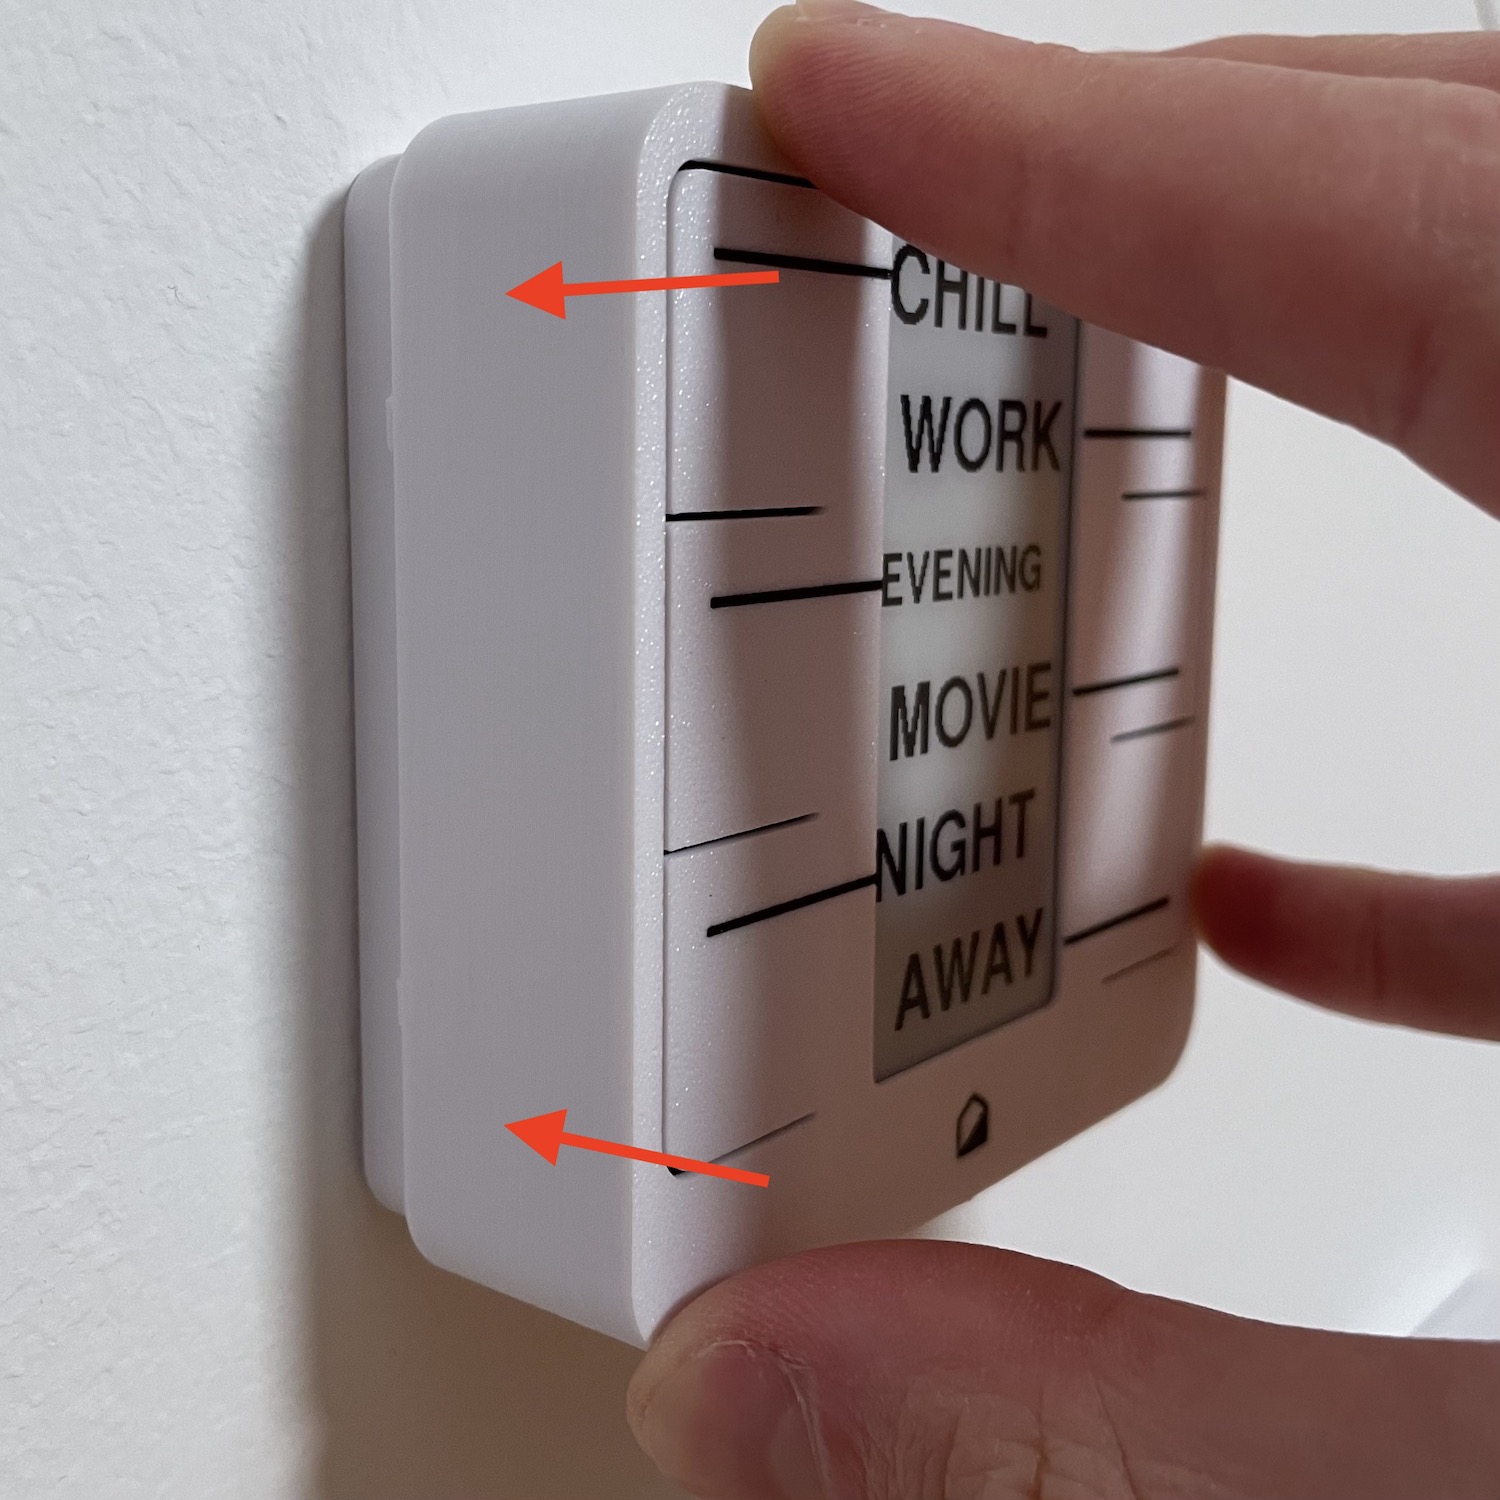
Detach the back cover by inserting a flat headed screwdriver in the hole at the bottom and twisting it.
-
Pull off the front of device. You may need to use some force. Hold device in the corners, where the case is strongest.
-
When you're done, reposition the front of device and push firmly until it's flush with the wall.