Getting Started
Setup up your Home Buttons in a few simple steps!
You will need:
- Depending on the desired power source (one out of):
- 18650 Li-Ion battery cell (not included). WARNING: maximum length is 65.5 mm. Button top cells might not fit properly.
- USB-C power brick
- 5V DC power supply
- 2x mounting screws with anchors suitable for your walls or double sided tape (must stick to plastic well)
- A Wi-Fi network
- An MQTT broker
- Home Assistant (optional - can work only through MQTT)
Solder battery holder or DC terminal
If you purchased a version of Home Buttons that requires soldering, see here for instructions.
You can skip this step if you purchased a fully soldered device.
Insert Battery Cell
Skip this step if you will power the device by USB-C or 5V DC input.
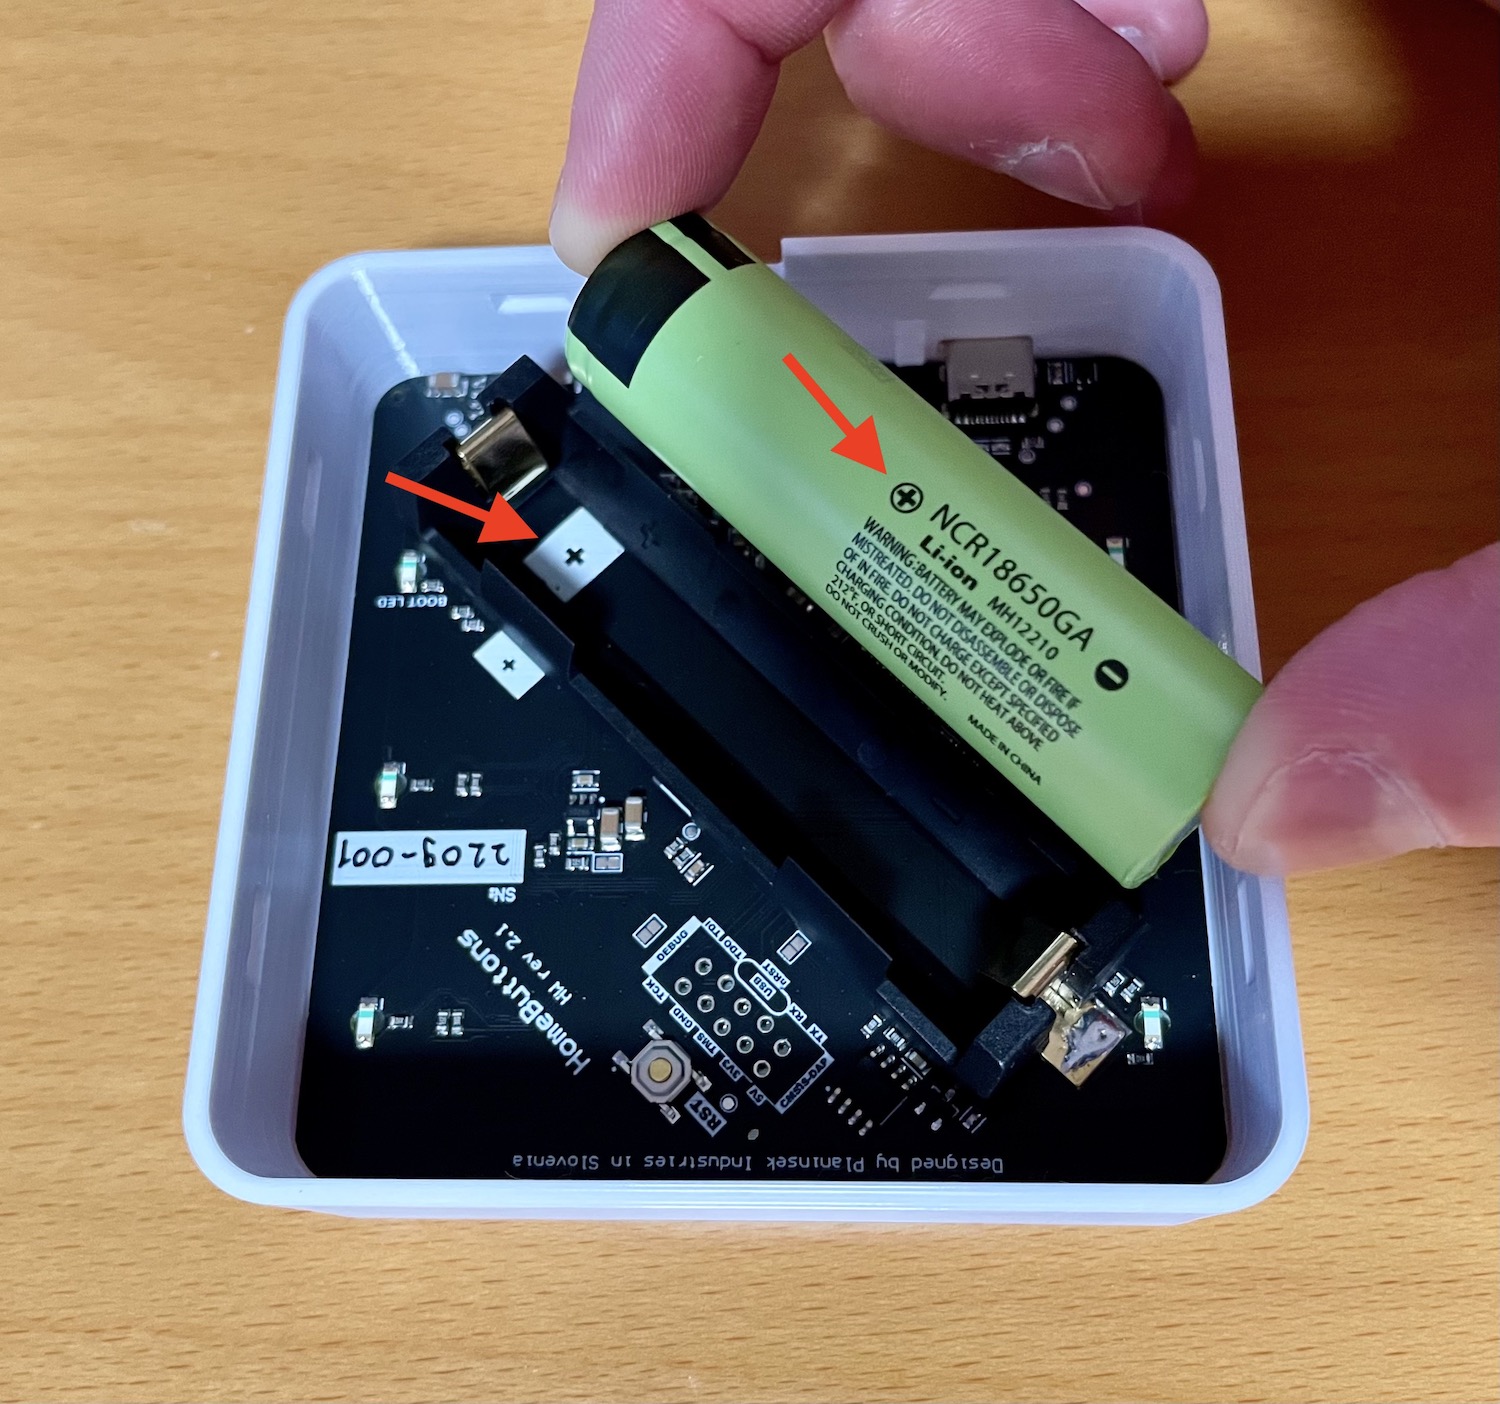
You need one 18650 Li-Ion battery cell (not included). Please use a high quality cell with greater than 3000 mAh capacity. The length of the cell must not exceed 65.5 mm. Button top cells might not fit properly.
If you have a device with a different case design see here for how to open it.
-
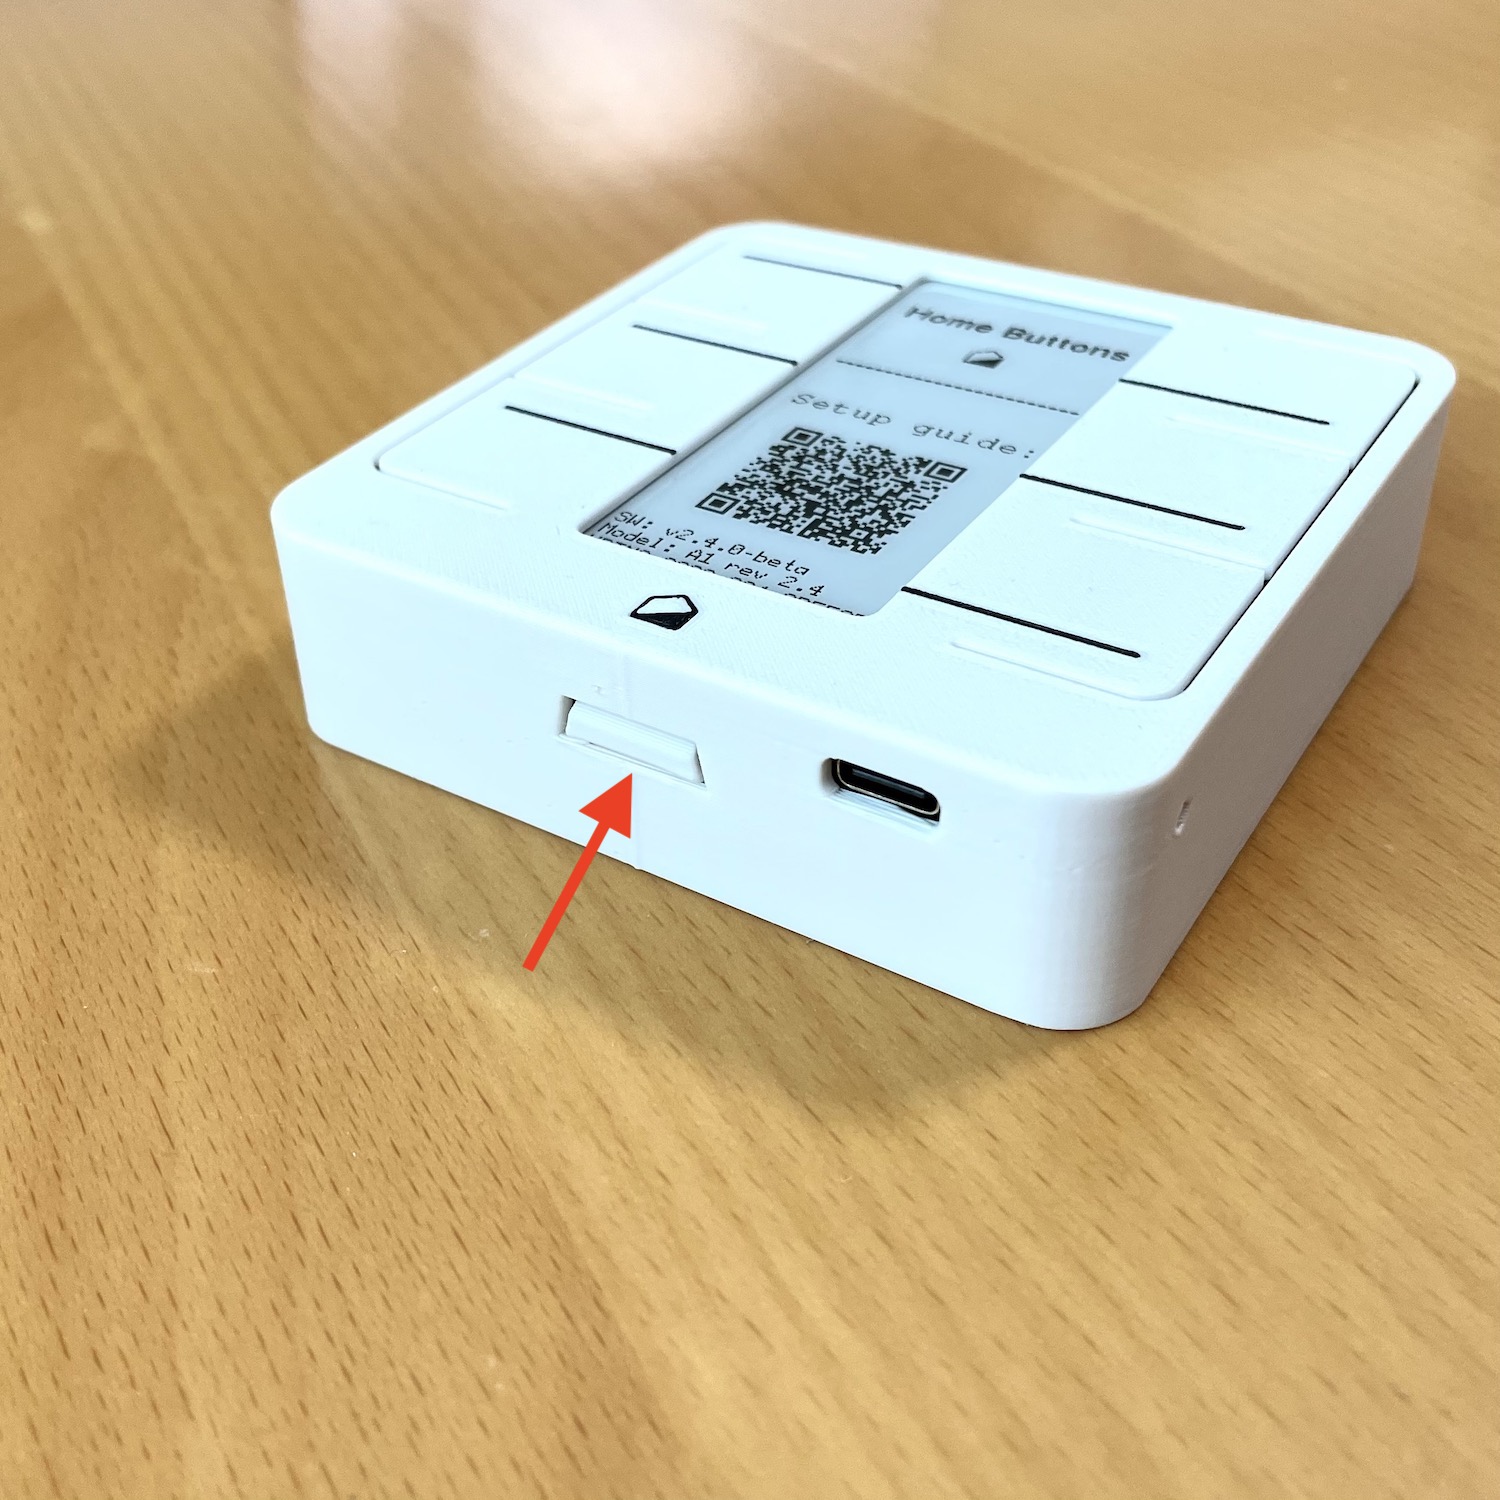
Open the back cover by pressing the tab on the bottom of the device.
-
Insert the battery cell. Be careful to orient it so that polarity matches markings on the PCB.
-
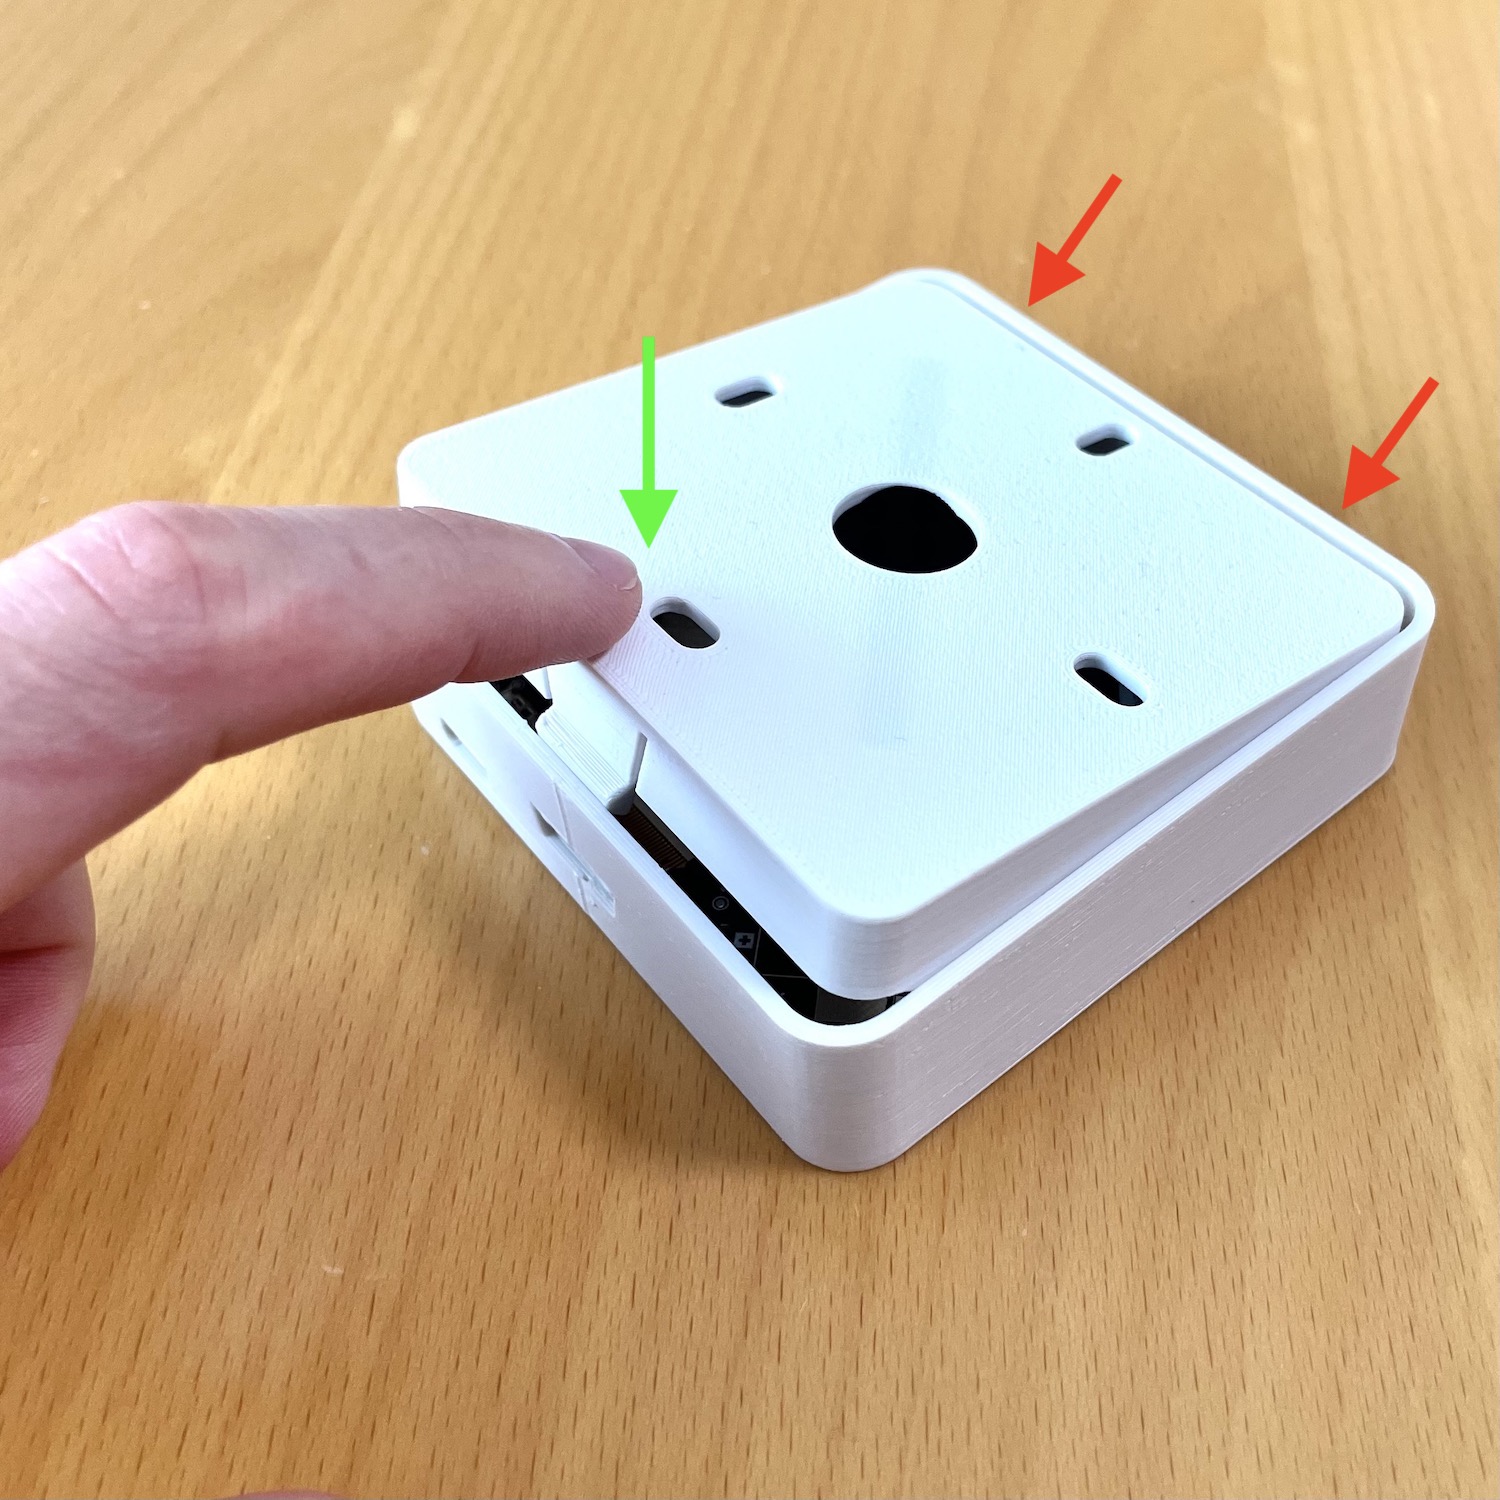
Replace the back cover by aligning it first at the top and then pressing it down until it clicks.
Set Up Wi-Fi Connection
After inserting the battery, press any button to wake the device and start Wi-Fi setup procedure.
If the device doesn't wake when pressing a button, briefly connect it to an USB-C charger
If you don't complete the setup in 10 minutes, Home Buttons will turn off again to save battery. Press any button to wake the device and start again.
-
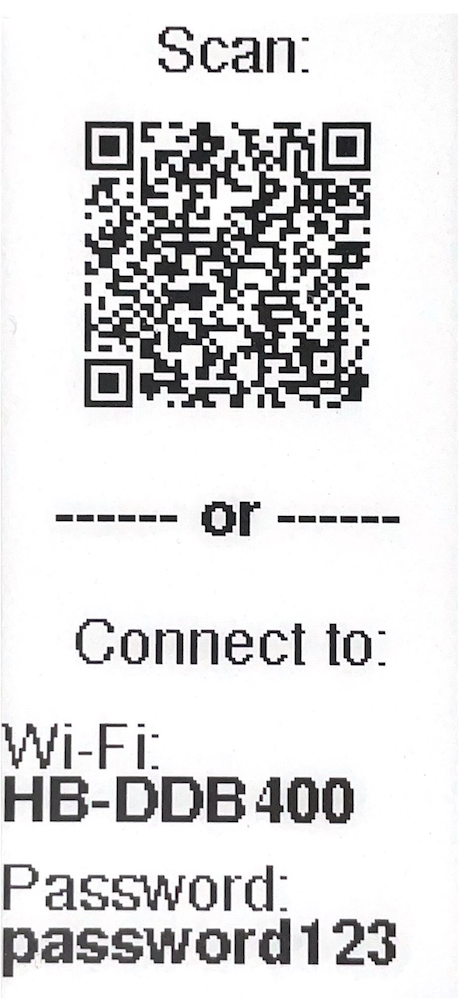
Home Buttons establishes a Wi-Fi hotspot for configuration. Connect to it by scanning the QR code on the display or manually connecting to Wi-Fi network and entering the password.
-
After connecting to Home Buttons Wi-Fi with your device, a captive portal will pop up automatically. If it doesn't, open the web browser and navigate to http://192.168.4.1.
-
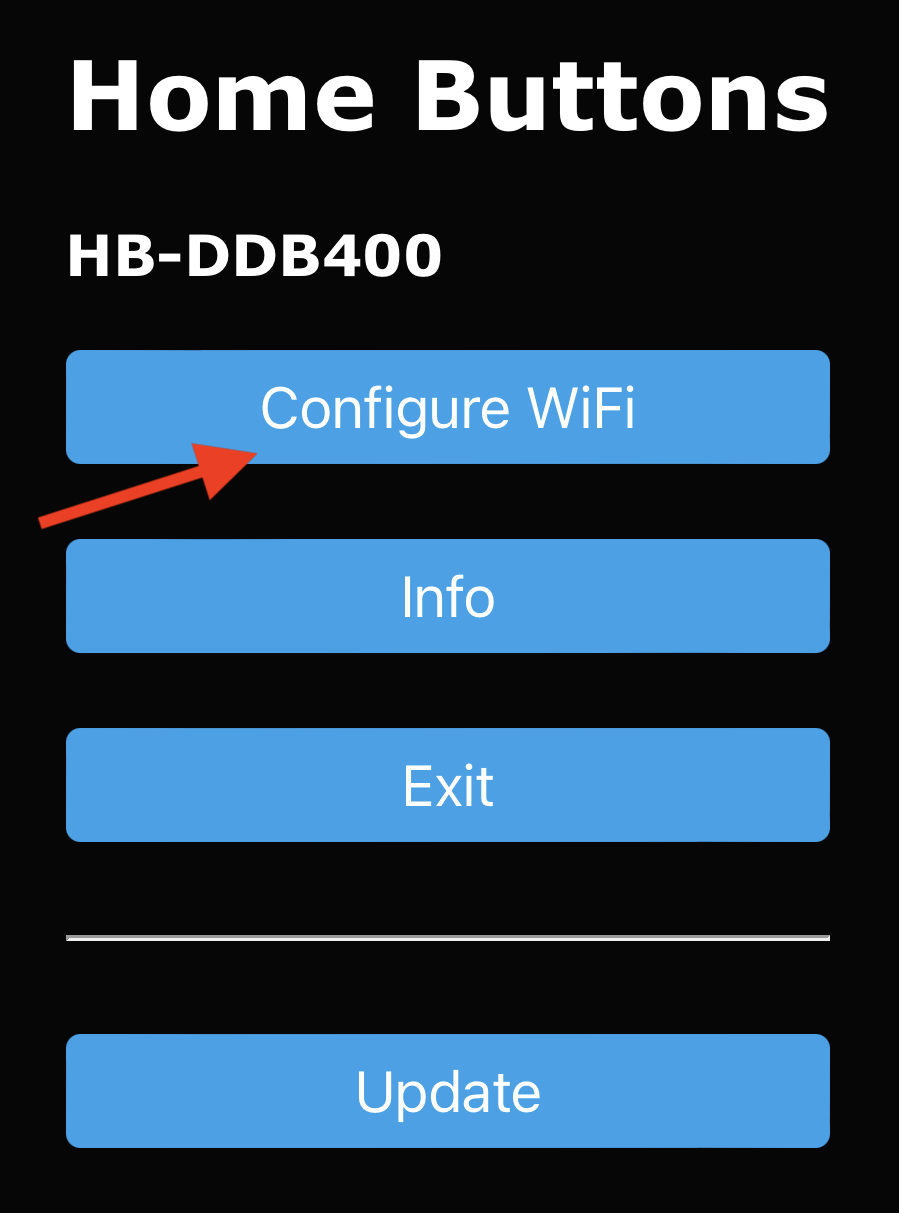
Click on
Configure WiFiand wait a few seconds for a list of networks to appear. -
Select your network, enter the password and click
Save.
Home Buttons will disable the hotspot and connect to your Wi-Fi network in a few seconds. Wi-Fi connected will appear on display.
If connection is not successful,
Wi-Fi connection errorwill be displayed and Home Buttons will return to welcome screen. You can start Wi-Fi setup again by pressing any button. Please make sure to enter the password correctly.
Set Up MQTT Broker
Home Buttons requires an MQTT broker. If you don't already use it, you should install one now. See this page for more information. Usually, the simplest way is to install Mosquitto MQTT as a Home Assistant add-on.
If you're using Mosquitto MQTT add-on, you must use username and password of your Home Assistant account. It's recommended to create a new account for use with MQTT.
If you don't use Home Assistant, see Minimal Setup guide.
Set Up MQTT connection
When connected to the Wi-Fi, Home Buttons can be configured using any device on your local network.
-
Scan the QR code or enter the local IP into a web browser. The setup page will load:
-
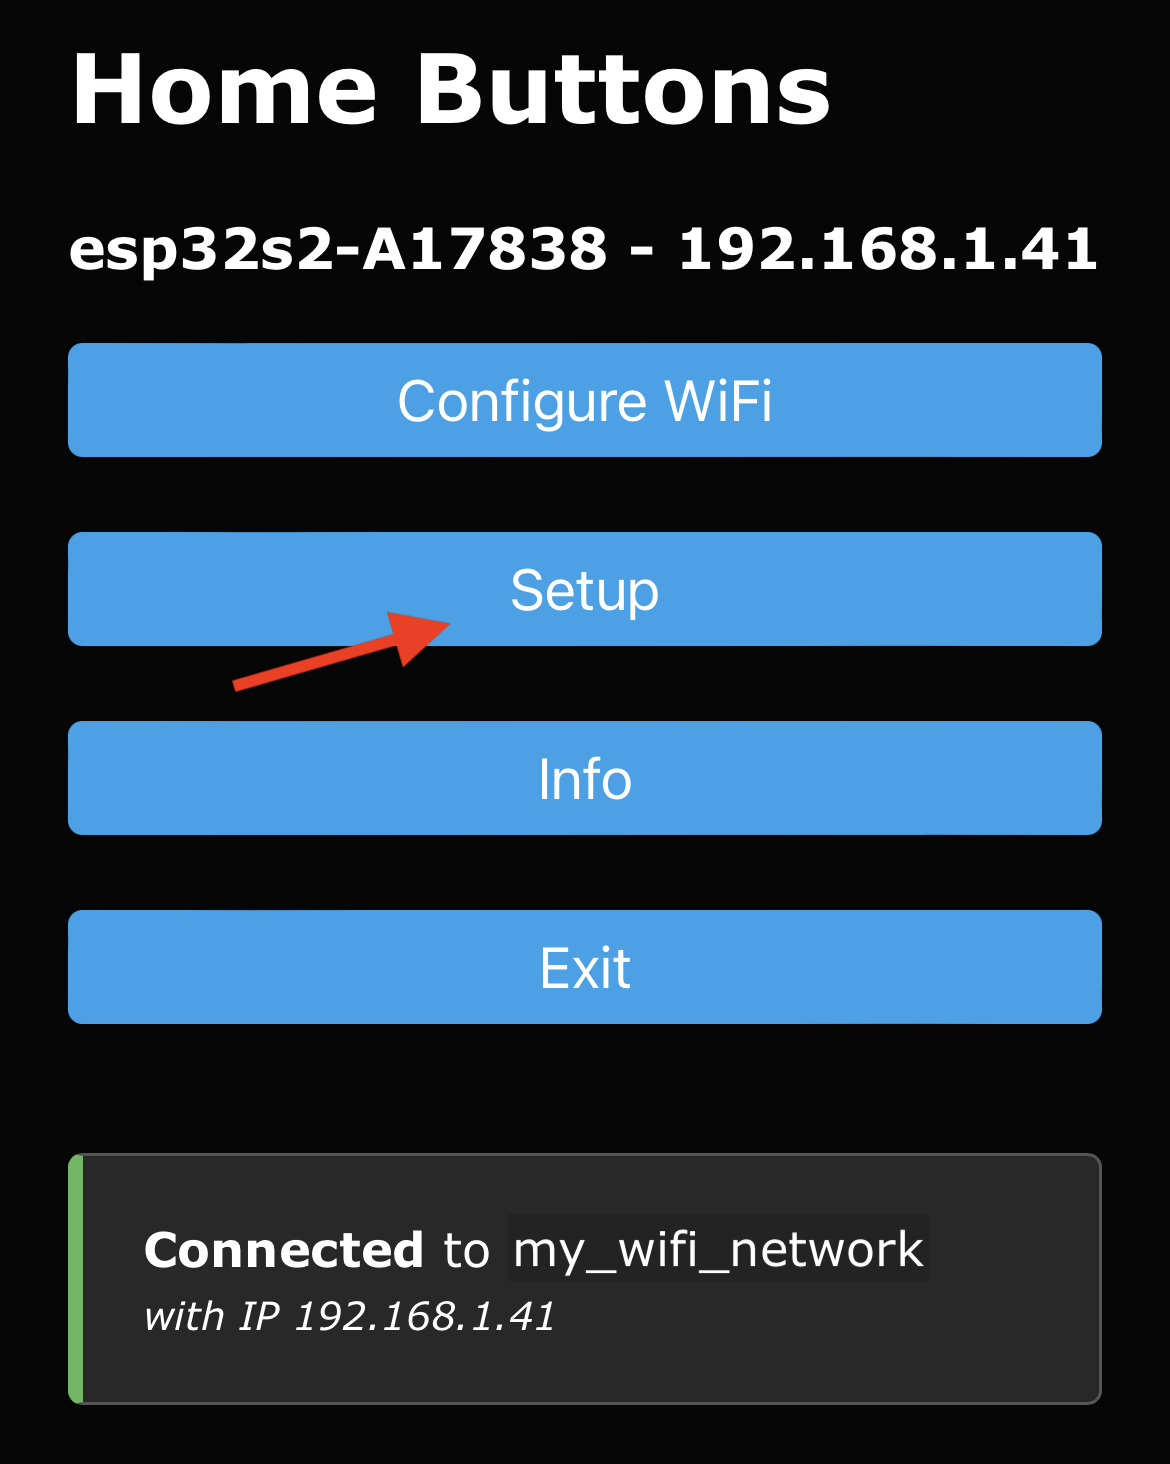
Click
Setup -
Enter the connection parameters:
-
Device Name- Name of your device as it will appear in Home Assistant. -
MQTT Server- IP address of your MQTT broker. Usually the same as IP of your Home Assistant server. -
MQTT Port- Port used by MQTT broker. The default is usually 1883. -
MQTT User- MQTT user name (can be empty if not required by broker). -
MQTT Password- MQTT password (can be empty if not required by broker). -
Base Topic- MQTT topic that will be prepended to all topics used by Home Buttons. The default ishomebuttons. -
Discovery Prefix- Home Assistant parameter for MQTT discovery. The default ishomeassistant. Leave that unchanged if you haven't modified Home Assistant's configuration. -
Temperature Unit- EitherC- Celsius orF- Fahrenheit.
-
-
Enter static IP details (optional):
-
Static IP- IP of Home Buttons. Must be outside the DHCP address range of your router. -
Gateway- The IP address of your router. -
Subnet Mask- Usually255.255.255.0. -
Primary DNS Server- If left empty,GatewayIP will be used. -
Secondary DNS Server- If left empty,1.1.1.1will be used.
This parameters are optional, but highly recommended, to reduce response time and increase battery life. Especially if you use a WPA-3 network.
Please double check that the IP address you enter is not already in use by another device on your network.
-
-
Enter button labels
This step is not necessary, you can do it later directly in Home Assistant.
Button {1-6} Label- Label that will be displayed next to each button. The order is from top to bottom.
-
Confirm by clicking
Save. Device will exit the setup and display button labels.
If MQTT connection is not successful,
MQTT errorwill be displayed and Home Buttons will return to welcome screen. You can start the setup again by pressing any button. Please make sure to enter correct MQTT parameters.
Set Up Home Assistant
Home Buttons uses MQTT Discovery and will appear in Home Assistant automatically.
To get to the device's page in Home Assistant, click settings in the left side bar, then open Devices & Services, move to the Devices tab and click on the name you gave your Home Buttons in the previous step.
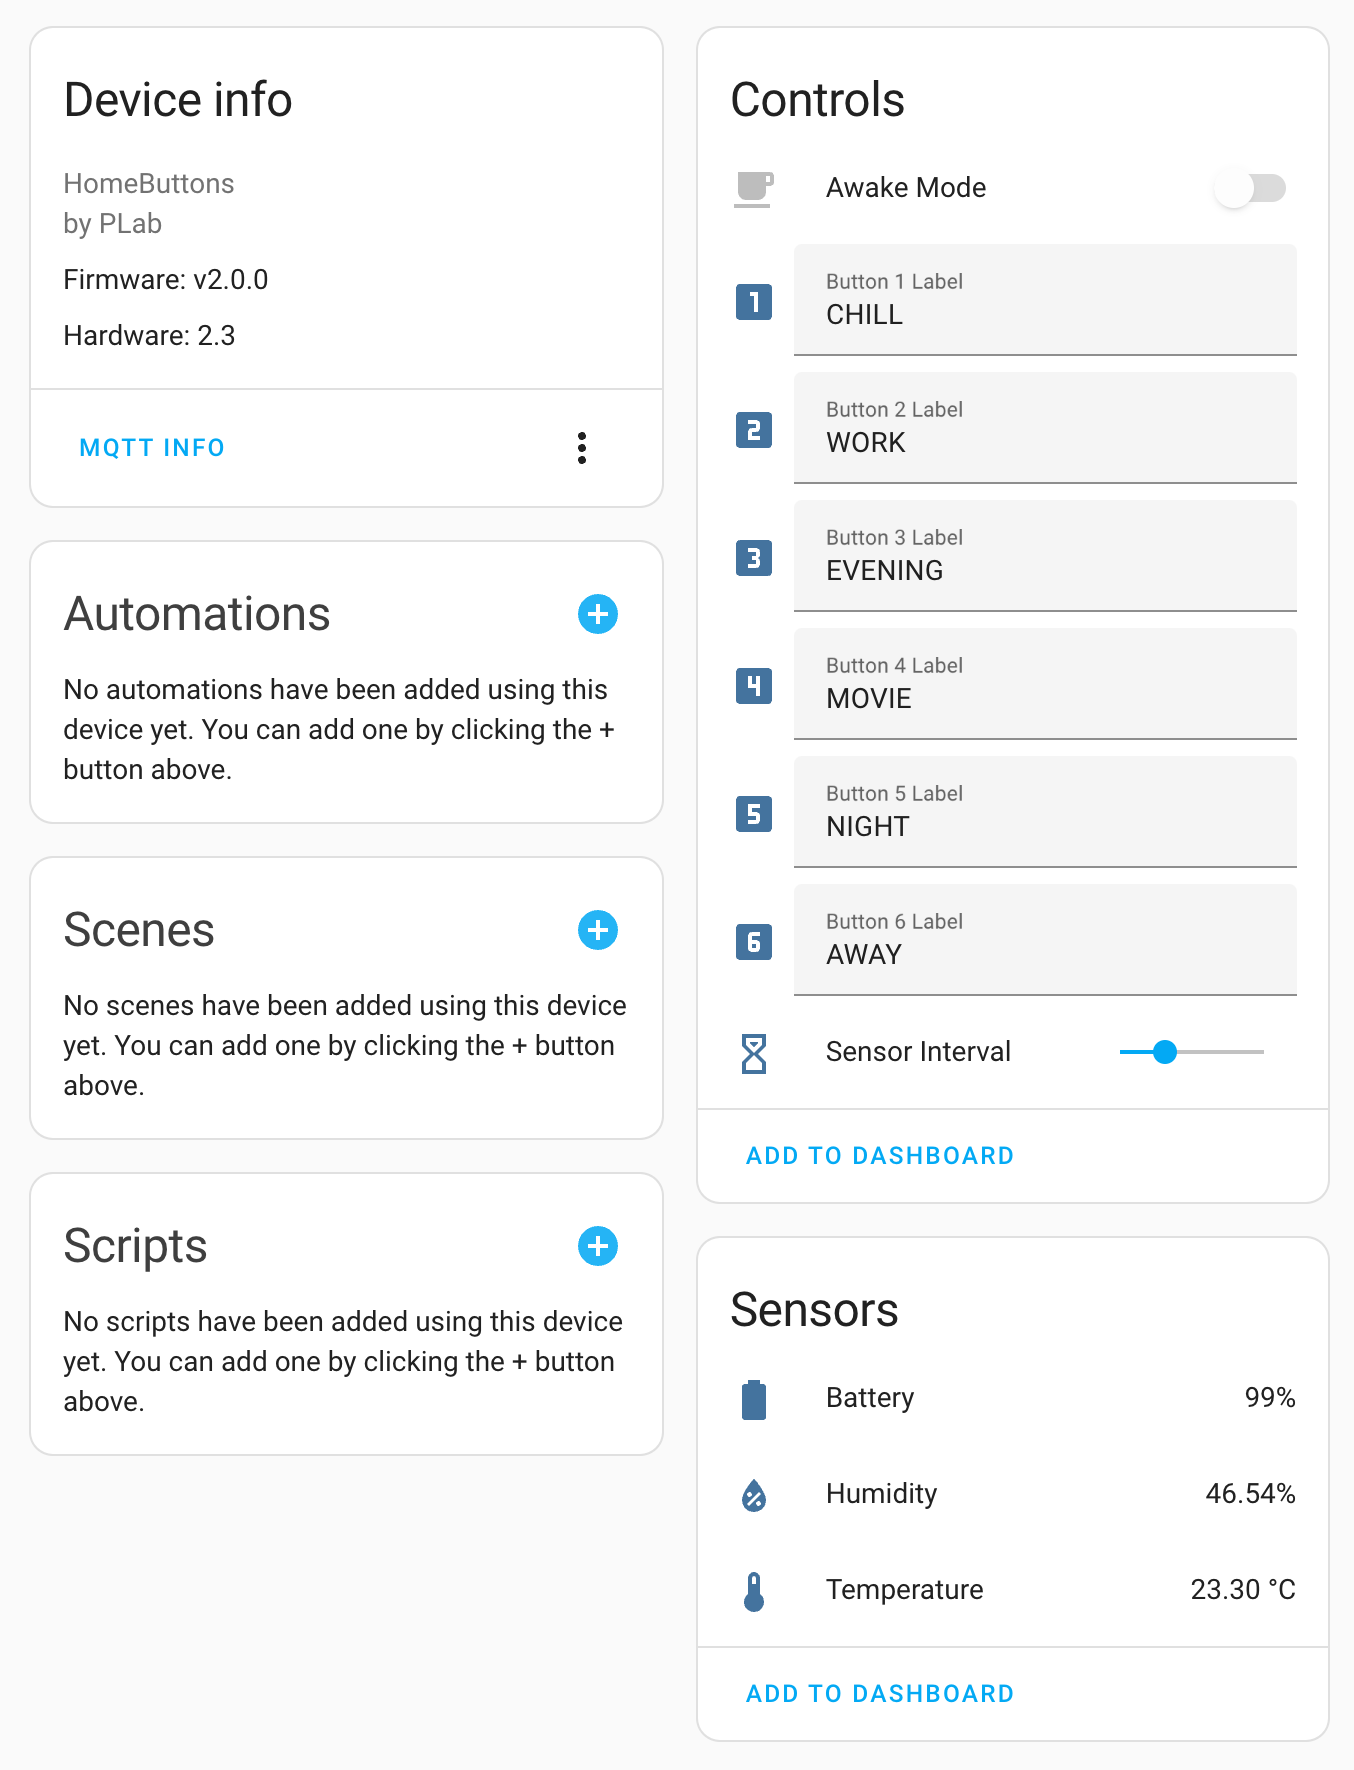
Here you can see device info, sensor readings and battery level. You can also configure button labels, button actions and sensor publish interval.
Configure Button Labels
In the Controls card, enter the button labels that you want to be shown on the e-paper display. The buttons are ordered from top to bottom. Labels will be updated next time you press a button or on the next sensor update interval.
Labels can be:
Text- Icon
- Mixed -
Textand Icon
Text
Enter any text you want. Labels support UTF-8 with special characters. Home Buttons will choose between two font sizes automatically. It can display around 5 letters in large font and around 7 letters in smaller font.
Icons
You can choose any of the Material Design Icons. Enter the icon name in the label field in the format mdi:{icon name}. For example, mdi:lightbulb-auto-outline.
Icons are downloaded from a Github repository. For that purpose an internet connection is required. Once downloaded, the icons are stored permanently on the device. If you do not wish to have Home Buttons connected to the internet, you can set up the icons once and then disable internet access.
Mixed
In label field, enter: mdi:{icon name} {text}. For example, mdi:lightbulb Bedroom. There must be a single space separating the icon name and the text. Label name must always be first. The actual position of the icon will be before or after the text, based on the location of the button.
Icons are slightly smaller in this mode.
Configure Button Actions
To configure button actions, click "+" on the Automations card, select one of the buttons and set up an automation with Home Assistant's editor.

The expected delay from a button being pressed to the automation being triggered is around 1 second (depending on your network).
Mount To The Wall
Mount the back cover of Home Buttons to the wall. There are 2 options:
-
Screws
Use two screws (max diameter 4.5 mm) with anchors suitable for your walls (not included).
-
Tape
Use double sided tape (not included). Use only high quality heavy duty foam mounting tape. A small patch of size around 1 x 1 cm in each corner works best.
Make sure the arrow is pointing upwards!
Other Important Information
Charging
The expected battery life is > 1.5 years with a high quality 18650 cell.
When the battery is getting low, Home Buttons will remind you to charge after pressing a button.
If the battery gets critically low, the device will turn off.
The display will show: TURNED OFF PLEASE RECHARGE BATTERY. You can see the remaining battery percentage as a sensor in Home Assistant.
Plug in any USB-C charger to charge the battery. The expected full charge time is 4 hours.
When the device is charging, there is a solid line displayed at the bottom of the screen. When charging is done, the line disappears.
For hardware revision <= 2.1 there is no charging indicator. When the battery is fully charged, the display will show
FULLY CHARGED.
Temperature & Humidity
Home Buttons includes a high precision temperature and humidity sensor. The readings are taken every few minutes (configurable) and on every button press. The values are displayed as sensors in Home Assistant.
You can bring up a display of current temperature, humidity & battery level by pressing any button for 2 seconds. The device will automatically revert to showing button labels in 30 seconds. Or do that manually by pressing any button again.
What's next?
See User Guide for further information.